

How To Draw Minnesota The Word
How to create custom views in android?
Earlier diving into the process of creating a custom view, It would exist worth stating why we may need to create custom views.
- Uniqueness: Create something that cannot exist done by ordinary views.
- Optimisation: A lot of times we tend to add together multiple views or constraints to create the desired view that can be optimized drastically in terms of draw, measure or layout fourth dimension.
The best way to start would be to understand how android manages view groups and lays out views on the screen. Let the states accept a expect at the diagram beneath.
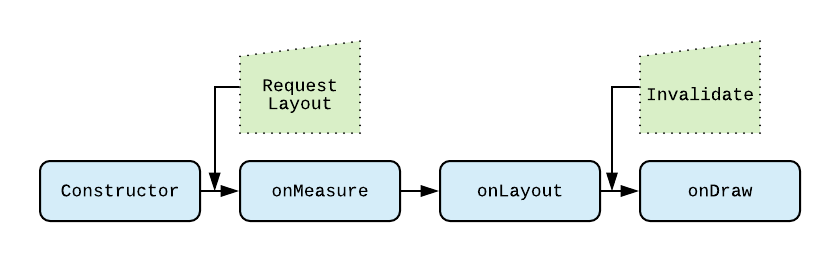
onMeasure(widthMeasureSpec: Int, heightMeasureSpec: Int)
Every parent view passes a height and width constraint to its child view based on which the child view decides how big information technology wants to be. The kid view then calls setMeasuredDimension() to store its measured width and pinnacle.
How are these constraints passed?
Android uses a 32-bit int chosen the measure out spec to pack a dimension and its mode. The mode is a constraint and tin exist of 3 types:
- MeasureSpec.EXACTLY: A view should be absolutely the same size every bit dimension passed along with spec. Eg. layout_width= "100dp", layout_width="match_parent",layout_weight="1".
- MeasureSpec.AT_MOST: A view can have maximum height/width of dimension passed. However, it can be also smaller if it wishes to be. Eg android:layout_width="wrap_content"
- MeasureSpec.UNSPECIFIED: A view tin can be of any size. This is passed when nosotros are using a ScrollView or ListView every bit our parent.
onLayout(changed: Boolean, left: Int, top: Int, correct: Int, lesser: Int)
Android applies whatever offsets or margins and calls this method to inform your view about where exactly it would be placed on the screen. Dissimilar onMeasure, it is called merely one time during the traversal. So information technology is recommended to perform whatever complex calculations in this method.
onDraw(canvas: Canvass)
Finally, Android provides you with a 2D drawing surface i.e the canvas on which you tin can draw using a paint object.
The UI thread then passes display lists to return thread which does a lot of optimizations and finally GPU process the data passed to it past render thread.
How to define attributes for your view?
Declaring XML attributes is simple. You just need to add together a declarable-mode in your attrs.xml and declare a format for every attribute.
For instance, if yous are creating a simple view which displays a circle with its label. Your attributes may look like this.
          <declare-styleable name="CustomView">
            <attr name="circleRadius" format="dimension" />
            <attr name="circleLabel" format="string"/>
            <attr proper name="showLabel" format="boolean"/>
            <attr proper name="circleColor" format="colour"/>
            <attr name="circleDrawable" format="reference"/>
            <attr proper name="circleColorType">
            <flag proper noun="none" value="0" />
            <flag proper name="fill" value="1" />
            <flag proper noun="stroke" value="2" />
            <flag name="fillStroke" value="3" />
            </attr>
</declare-styleable>
The same is referenced while creating a view in the following manner.
          app:circleRadius="5dp"
app:circleDrawable="@drawable/ic_bell"
app:circleColorType="fillStroke"
...
Now, we have to parse these attributes in your java or kotlin grade.
- Create your view class which extends the android.view course
- Obtain a reference to the attributes declared in XML. While attrs is passed in the constructor, the 2nd parameter is a reference to the styleable we just declared. The latter ii are used for getting default manner attributes in theme or supplying a default way attributes.
val a = context.theme.obtainStyledAttributes(attrs, R.styleable.YourCustomViewClass, 0, 0) - Parsing the attribute arguments
          radi= a.getDimension(R.styleable.CustomView_circleRadius,fallback)
showLabel= a.getDimension(R.styleable.CustomView_showName,fallback)
colorType= a.getInteger(R.styleable.CustomView_colorType, colorType)
Android automatically handles the process of converting dp or sp to the right amount of pixels co-ordinate to screen size when parsing a dimension aspect. But, You need to ensure that the fallback value is converted to appropriate pixel value since android returns fallback value without whatsoever conversions if an aspect value is not defined in XML.
While parsing all other attributes is quite straightforward. I volition brief you about how to parse flags. Declaring flags attributes tin can be really useful sometimes since we tin can check for multiple properties using a single attribute. This is the same manner android handles the visibility flag.
colorType hither is an integer which represents a flagSet. Now, since every fleck in an integer can exist used to represent an indication. We tin can bank check if a flag exists and perform our operations accordingly. To bank check if a flag type stroke exits, we can only perform an or operation on flagSet with the stroke value. If the result stays the same that ways the flag actually exists in the flagSet.
- Finally, recycle the typed array to be used by the afterward caller.
a.recycle() Initialising your objects
It is e'er improve to initialize your paint and path objects or other variables in the constructor itself. Since declaring information technology whatever other traversal method may result in the meaningless creation of objects again and again.
Calculating your view size
Calculating view size can exist actually challenging sometimes. You take to brand sure that your view does not take any extra pixel or request whatsoever less pixel as it may stop upward showing extra white space or non showing complete view respectively. These are the basic steps that you lot need to follow to calculate the size of your view.
- Calculate how much width and acme your view requires. For instance, if you are drawing a simple circle with its label below the circle. The suggested width would exist :
(circle diameter+ any actress width if occupied by the label). - Calculate the desired width by calculation the suggested width with paddingStart and paddingEnd. Similarly, desiredHeight would be suggested acme plus paddingTop & paddingBottom.
- Summate actual size respecting the constraints. To calculate this, you simply need to pass measure spec passed to you in onMeasure() and your desired dimension in this method chosen resolveSize(). This method would tell you closest possible dimension to your desired width or height while still respecting its parent's constraints.
- Virtually chiefly, yous need to set the final width and height in onMeasure method by calling setMeasuredDimension(measuredWidth,measuredHeight) to shop the measured width and pinnacle of this view otherwise, you might see your view crashing with an IllegalStateException.
Positioning your views
Nosotros can position our kid views by using the onLayoutMethod. The code simply may involve iterating over whatever child views and assigning them a left, acme, right and a lesser bound depending on measured widths and heights.
Drawing your view
Before using the canvas there are few things that we demand to understand:
- Paint: The Paint class holds the style and color information about how to depict geometries, text, and bitmaps. Here is how we create a paint object.
          mPaint = new Pigment();
mPaint.setColor(mDrawColor);
mPaint.setStyle(Paint.Mode.STROKE); // default: Fill up          //Smoothes edges of what is fatigued without affecting             interior             shape.
mPaint.setAntiAlias(true);          //            Dithering affects how colours with higher precision than device are down-sampled.
mPaint.setDither(true);          mPaint.setStrokeWidth(mStrokeWidth);
You can read about more about the backdrop here.
- Drawing Shapes: You can directly draw shapes like a line, arc, circumvolve etc on the sail. Let us take a look at the diagram below to gain a better understanding.
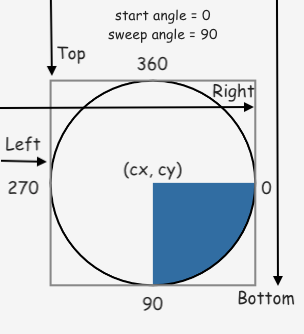
          override fun onDraw(sail: Canvas) {              super.onDraw(canvas)
              val cx = canvas.width/ii
              val cy = sail.meridian/2                          ovalRect.left = cx - circleRadius
              ovalRect.peak = cy - circleRadius
              ovalRect.right = cx + circleRadius
              ovalRect.lesser = cy + circleRadius                          sheet.drawArc(ovalRect, 0F, 90F, true, mCircleFillPaint)
              canvas.drawOval(ovalRect, mCircleStrokePaint)
              canvas.drawRect(ovalRect, mRectStrokePaint)            }
Using Paths: Drawing complex shapes with the above methods may get a bit complex so android offers a Path grade. With the Path grade, you can imagine that y'all are holding a pen and you can depict a shape, and then maybe move to a different position and draw another shape. Finally, when y'all are washed creating a path. Y'all can simply describe the path on the canvas like this. Also, when using paths you lot can also use unlike path furnishings (discussed below in detail). Below, is an example of the shape created using paths.

          val cx = canvas.width/two
val cy = canvas.height/2
val bending = ii.0 * Math.PI            / 5
//motility to pos 1
path.moveTo(
            cx + (radii * Math.cos(0.0)).toFloat(),
            cy + (radii * Math.sin(0.0)).toFloat())          //draw all lines till pos 5
for (i in 1            until            5) {
            path.lineTo(
            cx + (radii * Math.cos(angle * i)).toFloat(),
            cy + (radii * Math.sin(angle * i)).toFloat())
}
// bring together pos 5 with pos i
path.shut()          //if y'all want to add together a circumvolve effectually the polygon using path
// path.addCircle(cx, cy, circleRadius, Path.Direction.CW)          //draw polygon
canvass.drawPath(path, mShapePaint)
- Path Effects: If you also apply a Corner path effect to your pigment object with a certain radius the polygon will wait like this. Yous can too use other path effects like DashPathEffect, DiscretePath etc. To combine two different path effects you lot tin can use the ComposePathEffect.
mShapePaint.pathEffect = CornerPathEffect(20f) 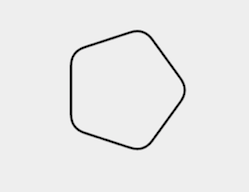
- Drawing Bitmaps: To draw bitmaps on the canvas, you tin can apply
canvas.drawBitmap(bitamp , src, dest , paint) bitmap: Bitmap that y'all desire to draw on canvas
src: Information technology takes a rect object which specifies the portion of the bitmap yous want to describe. This can exist null if you want to describe the complete bitmap.
dest: A rect object which tells how much surface area do yous desire to encompass on the canvas with the bitmap
pigment: The paint object with which you desire to describe the bitmap
Android automatically does all the necessary scaling or translation to fit the source on destination area.
You can as well draw drawables on canvas.
          drawable.setBounds(left, top , correct , bottom)
drawable.draw(canvass)
Before cartoon a drawable, you would need to set up bounds to your drawable. The left, meridian, correct and bottom describe the drawable's size and its position on the canvas. You can find the preferred size for Drawables using getIntrinsicHeight() and getIntrinsicWidth() methods and decide bounds appropriately.
Cartoon Texts: Drawing texts tin can be a chip of hurting. Not the drawing itself, but the alignment or measurement of text. This occurs considering different characters accept different heights and to make information technology more worse in that location can be different typefaces too. And so to mensurate a text's height you would need to calculate specific text bounds for your text similar this.
textPaint.getTextBounds(yourText, startIndex, endIndex, rect ) Then, the rect object passed in the finish would then contain the text bounds of actual text to be drawn. This mode you can calculate the actual height of text to be fatigued and set a right baseline y for your text. To calculate the width of your text yous should use textPaint.measureText() as it is more authentic than the width given by paint text premises (because of the mode these methods are implemented in skia library). Alternatively, for ensuring the text is centered horizontally on the canvass you lot can only prepare your paint's alignment to TextAlign.Centre and laissez passer center bespeak of your sheet in the x coordinate.
canvass.drawText(text, xPos , yPos , paint) Drawing multiline text: If you desire to handle line breaks (\n) or If you have a stock-still width to draw a text y'all tin can use Static Layout or Dynamic Layout. This would automatically handle all the word breaks or line breaks and also tell you how much height would be needed to describe a text in given width.
          //building a static layout
var builder = StaticLayout.Architect.obtain(text, 0, text.length(),textPaint , width);
StaticLayout myStaticLayout = builder.build();
var heightRequired = myStaticLayout.meridian          // the drawing part
canvas.salve()
canvas.translate(xPos, yPos)
myStaticLayout            .draw(canvass)
canvas.restore()
- Saving & Restoring Sail: Equally you might accept noticed, we demand to save the canvas and translate it before drawing on information technology and finally nosotros have to restore the canvas. A lot of times we need to draw something with a different setting such equally rotating the canvas, translating information technology, or clipping a certain role of sail while cartoon a shape. In this case, we can phone call canvas.save() which would save our current canvass settings on a stack. After this, we change canvas settings ( translation etc) and then draw whatsoever we desire to with these settings. Finally, when nosotros are done drawing we can phone call canvas.restore() which would restore canvas to the previous configuration that we had saved.
- Handling User Inputs: Finally, you lot accept created your own custom view using XML attributes, BUT what if you want to change any property at runtime such as the radius of the circle, text colour etc. You would demand to inform Android API's to reflect the changes. Now, if any change in property affects the size of your view y'all will prepare the variable and telephone call requestLayout() which would recalculate your view'due south size and redraw information technology. However, if a holding like a text color is changed you would merely need to redraw it with new text pigment colour and in this case, it would be wise to only telephone call invalidate().
Boosted Note: Now if your view has a lot of attributes, there may be a lot of times you would have to write invalidate()/requestLayout after every setter. This trouble can be solved past using kotlin'due south delegates. Let us take a look a the instance below to exist more clear.
var textColor: Int by OnValidateProp(Colour.Black)
var circleColor: Int by OnValidateProp(Color.CYAN) grade OnValidateProp<T>(private var field: T, private inline var func: () -> Unit of measurement = {}) {
operator fun setValue(thisRef: Any?, p: KProperty<*>, v: T) {
field = v
invalidate()}
operator fun getValue(thisRef: Any?, p: KProperty<*>): T {
return field
}}
Now, If I know that a property if changed should merely redraw the view, I would initialize it using OnValidateProp simply if it can affect the size of the view I would initialize by creating a new OnLayoutProp delegate.
Finally! You can showtime past creating your own custom views. If you lot are interested to come across what an actual custom view code looks like. You can cheque out the library that I just published. It displays steps forth with the descriptions and covers well-nigh of the things that I have discussed in this article.
In conclusion, I volition mention some of the best practices that you should e'er consider to optimize your custom view's performance.
- Invalidate intelligently: Do not telephone call invalidate unless and until something visible to the user has changed. Secondly, when y'all are calling invalidate if possible pass a rect object in invalidate method to tell the GPU what function of the screen needs to exist drawn.
- Draw carefully: Do non draw things that are not visible to the user. After all its a second surface and it would exist useless cartoon something which is afterward overlapped by something else. You tin can achieve this by using Canvass.clipRect(). Also, do not draw something that is out of the screen premises. You lot tin can achieve this by using canvas.quickReject().
- Never allocate objects in onDraw : onDraw() gets called 60 times a 2nd. although garbage collectors are really fast so there may not exist a GC related drib but they run on a separate thread, which would mean that you might be eating a lot of battery. Moreover, since most of the time the type of objects initialized in onDraw are drawing objects (wrappers effectually C++). Information technology leads to calling a lot of destructors and hence running finalizers to repossess object's memory which is never expert for performance.

Source: https://medium.com/mindorks/how-to-create-custom-views-141dc0570e57
Posted by: simonssayint.blogspot.com
0 Response to "How To Draw Minnesota The Word"
Post a Comment